Archive for November, 2009
Meet Sticky. Sticky’s a lizard that my son, Hank, found a few weeks back. He’s been staying with us for a while until today when he was returned to his woodland home out back.

Before going, Sticky posed shortly for a photo shoot on my son’s sweatshirt. (Like the dog hair?) Now we’ll always have these portraits to remember his green scaly self by.

Sticky’s brilliant green against the vibrant red reminded me of a book our friends, The Lanford’s, gave us for Christmas in 2000 called The Christmas Lizard.

The book has since become a favorite that we read aloud this time every year – even though my kids are now 11 and 14. It’s about a little lizard, called Oscar who escapes from his cage one night only to discover the family Christmas tree. Isn’t he cute?

As he climbs the tree he meets many new friends; elves, a nutcracker, a bird and an angel to name a few. The lizard is curious as to what Christmas is all about.

Each new friend has his own point of view but in the end he finds the real reason for all of the celebration. A baby.

It’s a sweet book with great illustrations full of color and ample opportunity to exercise those Russian nutcracker voices you’ve all been practicing. You can include The Christmas Lizard in your yearly traditions. And it would make a great Christmas gift for a young family of lizard lovers. You’ll find more information on how to purchase the book here.
Do you have any favorite Christmas books? Or is there a favorite Christmas tradition you can share?

You’re in for a treat. Instead of telling you all about how yummy this muffin recipe is, my husband, who I love so much, wrote a song about these muffins that he loves so much (he loves me too, very much). Never a dull moment around here folks.
For your entertaining pleasure, my husband, Randy…
Hope you enjoyed the little ditty. In our home we break out in song at the drop of a hat, but these muffins were definitely song worthy.
Start with some butter and chocolate…

Then add some of these…pistachios are so satisfying, certainly a flavor that can’t be duplicated.

And cranberries add a little zing to these muffins.

Mix it all up with some eggs, flour, sugar and a splash of vanilla and you’ve got yourself some muffins that’ll make you sing. Or at least hum a little.

So good.
For real.
Make ‘em and you can see for yourself. And maybe you’ll sing a little too.
This recipe came way through my friend, Ansley, from her mom who I’ve never met but I love like a mom too for this fabulous muffin recipe. Thank you Ansley’s mom. The muffins were originally called Traveling Muffins but since they inspired song they’ve been renamed. (Another reason I renamed them is because, as a traveling muffin, they wouldn’t last long in my car.) The original also called for raisins (instead of cranberries) and pecans (instead of pistachios).

They’ll Make You Sing Muffins (or at least hum a little) Recipe
(makes 10 jumbo muffins)
(adapted from Ansley’s mom’s Traveling Muffin recipe)
Ingredients:
- 2 sticks of butter
- 3 squares (3 0z.) semi-sweet chocolate
- 1 cup cranberries (washed and dried)
- 1 3/4 cup shelled dry roasted, salted pistachios
- 1 cup all-purpose flour
- 1 3/4 cup sugar
- 4 large eggs
- 1 teaspoon vanilla
Directions:
- Preheat oven to 350°F.
- Grease muffin tin or use paper liners.
- In a small saucepan over low heat melt butter and chocolate.
- Add cranberries and pistachios. Let cool.
- Mix together flour, sugar, eggs and vanilla. Do NOT beat; just mix until combined.
- Fill prepared muffin tin with batter. For jumbo muffins, use ~1/3 cup batter per muffin.
- Bake 30-35 minutes (for jumbo muffins) or until toothpick comes out clean when inserted in the middle.
Enjoy! What’s your favorite food that makes you sing?

Here’s a sweet treat that’s easier than pie. Nothing fancy schmancy here folks. But tasty? Yes siree bobtail! Some may think this is fodder for rednecks. That might be, and if so, then I guess I might be a redneck. Jeff Foxworthy would be proud.
Nope. I don’t discriminate. All kinds of food are welcome here.
My friend, Ansley, passed along this recipe so I don’t know where it originated but it must’ve been from some real creative cook somewhere with a red neck. Ansley said I just had to try it and pass it along to all of y’all. And so I did.
And I’m so glad she’s my friend.
I’ve heard some call it Christmas Bark but then that would imply that it’s only appropriate for Christmas time and that’s just not right. What if I want to have some in July? So I’m naming it Redneck Toffee. Call it what you may but that works around these parts.
The ingredients? Simple, but oh, so, so…wicked. This is not diet food people. If you’ve had these before, you know what I’m talking about. I made the mistake of beginning to calculate the nutritional value. Don’t do it. Just walk an extra mile or two. Or three. They’re worth it.
Many are surprised to find that saltine crackers are at the root of all the evil. And butter…and sugar…and all things sweet. So if you’re not into all that good stuff, turn away. Turn away now.

Still here? Yea! Let’s continue…
As I said the ingredients are simple. Saltine crackers, butter, brown sugar, toffee bits, chocolate chips and pecans. The toppings can easily be mixed up. Coconut would be wonderful. Or white chocolate chips – yum. And any other nut could be substituted or you could leave off the nuts altogether. This is a flexible recipe, so if you need to change up amounts of ingredients go ahead. Sin is sin.
And the prep? It couldn’t be easier. It goes something like this…
Preheat oven to 350° and in a small sauce pan melt 2 sticks of butter, add 1 cup of brown sugar and stir well to combine. The sin commences.

Cover a baking sheet(s) with a single layer of saltines, edges touching. I used two 13×18″ (approx.) baking sheets coated with cooking spray or you could use parchment paper as well as a silicone baking mat. It took about 2 1/2 sleeves of saltines to cover the 2 baking sheets.

Slowly pour the melted butter and brown sugar sinfulness over the crackers, stopping occasionally to gently spread with a pastry brush.

When every cracker is coated, sprinkle the toffee bits over all the crackers. Warm in pre-heated oven until toffee bits begin to melt slightly (4-7 minutes depending on your oven). Watch carefully to avoid burning.

Remove baking sheets from oven and spread chocolate chips and pecans covering all areas. Add more or less to your liking. I placed mine back in the still warm oven but it was OFF to melt chocolate chips slightly.

After chocolate chips are melted, remove again from oven and let cool. When baking sheets are cooled, you can cover the treats with foil, parchment or wax paper and put in the fridge for about 5 minutes to harden up a bit.
Use a spatula or knife to gently cut apart along the edges of the individual crackers.

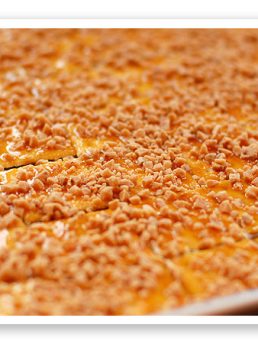
Redneck Toffee Recipe
(96 servings)
- 2 sticks (1 cup) unsalted butter
- 1 cup brown sugar, packed
- 96 saltine crackers (about 2 1/2 sleeves of saltines)
- 8 0z. bag of toffee bits
- 12 oz. mini chocolate chips
- 1 1/2 cups pecans, chopped
Directions:
- Preheat oven to 350°
- In a small sauce pan melt 2 sticks of butter, add 1 cup of brown sugar and stir well to combine.
- Cover a greased baking sheet(s) with a single layer of saltines, edges touching. (I used two ~13×18″ baking sheets coated with cooking spray. You could also line them with parchment paper or a silicone baking mat. It took about 2 1/2 sleeves of saltines (96 crackers) to cover the 2 baking sheets.)
- Slowly pour the melted butter and brown sugar over the crackers, stopping occasionally to gently spread with a pastry brush.
- When every cracker is coated, sprinkle the toffee bits over all the crackers.
- Warm in pre-heated oven until toffee bits begin to melt slightly (4-7 minutes depending on your oven). Watch carefully to avoid burning.
- Remove baking sheets from oven and spread chocolate chips and pecans covering all areas. Add more or less to your liking.
- Placed baking sheets back in the warm oven (but OFF) to melt chocolate chips slightly.
- After chocolate chips are melted, remove again from oven and let cool.
- When baking sheets are cooled you can cover the treats with foil, parchment or wax paper and put in the fridge for about 5 minutes to harden up a bit.
- Use a spatula or knife to gently cut apart along the edges of the individual crackers.
- Store in airtight container.
Enjoy! Forgiveness and exercise is for all.


